The Back Porch- AKA: The box supported by NOTHING! Lessons in Rot and building the wrong way round.
Water + Wood= BAD
Covid 19= More time at home= Time to take on projects you might not have otherwise
Vocab to know:
Ground Level, Pitch, Concrete Masonry Unit (concrete block), Mortar, Course (of blocks), Sill plate, Studs, Joists, Line Level, Square/Level/Plumb, Plumb Bob
Have you ever walked by someone's house, seen their raised garden beds running right up to the house siding and thought, "Oooh, that's a pretty?" Have you ever seen it and thought, "Oooh, that's a problem!" Yeah, I never used to have the second reaction, but now I see water issues everywhere. I've developed a strong sense of "That's a problem" when looking at dirt near siding or any wood regularly exposed to standing water. I've studied up on the basic construction rules : No untreated wood touching concrete or dirt- ideally even treated wood has a barrier so it is not touching at all, siding at least 6-8"+above ground level - depending on product, use of closed cell foam and housewrap, flashing, flashing tape, overhangs, and caulk to separate and seal up everything nice and tight so water never has a chance to soak in and rot wood.) Ground cover sloping away from all structures. So far as I can tell the last owner of our home, Carl, not only did not read anything like what I have read but instead went by the construction theory of "well, wood takes time to rot and it should last longer than me, and that's good enough."
I've continued to repeat the Girl Scout pledge to "make every place better than you found it." (I mean it's been over 30 years, I think I pledged something like that.) In our home, my husband Jon and I often refer to things in terms of "Do it better than Carl" or, in cases of poor effort or craftsmanship a simple "Okay Carl!" will suffice to let each other know what we think of the (poor) quality of decision making. ("Can't we just use a shim/caulk/screw/mending plate?"..."No Carl.")
Carl (and possibly the owners before him) definitely had no regard for the long-term structural integrity of the back porch or just had no idea or concern for how water and gravity work together. While the poured concrete steps coming out of the garden-level basement are solid, and the stone, concrete and masonry walls at the foundation level are good, the rest of the patchwork collection of add-ons are compounding levels of awfulness which led to a lot of water intrusion and rot.


In May 2020, following the need for a chimney removal to stop a roof leak and having a roofing contractor refuse to use our porch roof (the site of our new $3000 A/C condenser) due to "squishiness" we ended up doing two roof repairs on the same day with chimney removal/capping on the upper roof and a full replacement of everything down to and including portions of ceiling joists on the porch roof.

Before: Rubber/Asphalt sheets rolled out, top nailed and joined with tar. All nailheads uncovered and tar old and cracked. The rot below extended through multiple sheets of plywood as well as portios of a couple of the ceiling joists. Thankfully none of the plywood boards below the A/C were too bad off but they still had to lift and maneuver it gently, working new shingles underneath. Pretty sure Carl must have done this himself as I'm not sure you could hire someone to make such bad choices.
 Scraping off old layers of plywood, shingles and tar paper. You can see the dark portions of wood that had to be removed. The rot had extended into portions of the ceiling joists below, likely due to a sagging gutter that dumped water back towards the roof.


With both the normal spring rains plus unseasonably warm weather for Chicago and far too much time on our hands, Jon and I were spending more time outside and in the backyard and started noticing and poking around at the water intrusion under the back porch and the "earthy" smell that accompanied it. I pulled off a concrete board panel on the bottom interior of the porch, pulled out a couple of handfuls of dirt, poked some more and made a hole all the way to the outside.


Jon had been poking about himself, looking at the electrical line that ran below the raised garden bed and out to the pergola. He had dug a little and found the buried metal conduit had rusted through and broken off just below the dirt and the wires were the only thing holding the pieces together.
Thus began the great backyard dig out (that will likely be covered in other posts) Suffice it to say that the dug out back yard revealed a whole bunch of disconcerting things ...and rot that made us move our back porch up in the timeline of home repairs.
 Remove, remove, remove
 Dig, haul, dig, haul, rinse & repeat
 If you look closely you can see the place where the corroded conduit is missing/rusted away entirely

We found a Grease Trap! We had heard of these and plumbers kept looking for one, but we finally located it under about 3 feet of dirt, giant rocks and random chunks of concrete (along with a few other surprises.)
 Are we done digging yet? No. Not even close.

Let me describe the design/layout of the porch a bit. Our townhouse (19 ft wide) faces south so the back porch is on the north side of the house (the dark side, where there is less sun to dry things out or grow even the most water-loving plants.) The porch is about 15 feet wide. The shorter west side has a walkway with a shared "alley" between our house and the one just beside us, the other short side of the porch is about a foot away from the matching exterior wall of the porch of our East side neighbor. As I described earlier, there are concrete steps with stone walls on either side coming out of the basement door (the door centered and the steps leading up to the west.) At the top of the stone wall of those concrete steps is a poured slab of concrete. It is about 5 ft up when standing at basement level. It covers most of the ground below the upper portion of the porch, save for an added portion (separate and slightly raised slab) along the west side of the porch and below the steps coming down from the 1st floor. From the edge we've dug up both slabs look like about a 4 inch thick slab that might have once either been a back patio or a slab under an open air wood structure. There are slightly raised 1.25"x 7"x7" pads under the corner posts as part of the poured slab.

Corner post on 7x7 concrete pad/platform (photo from later in the process with temporary supports in place of rotted out original post)
The floor joists for the upper portion of the porch are old and solid and extend into the masonry wall with a slight downward pitch (1-2 degrees) to the outer edge (appropriate and expected for an open porch structure.) At some point in the past the porch was enclosed with an outer wall, windows, drywall and tongue-in-groove wood wall and ceiling coverings. Probably at that same point, but possibly sooner, someone moved the stairs coming from the back porch from being outside of the structure on the NE corner to being part of the interior portion of the enclosed porch. The door to the exterior is in the mid point of the stairs at the landing where the basement and upper stairs meet on the Southwest corner of the porch. (However the landing is actually one step down from the door frame) On the exterior, a brick patio was installed on top of sand (raising the ground level up to 7" in some spots), the porch was covered in Pressed Hardboard siding, and a raised garden bed with partially mortared stone wall edging was placed against the porch exterior with some bricks and pebbles placed directly against the wood. Eventually a large trellis covered fence was added extending about 5 feet up along the back wall and the side of yard.
All of these changes, starting the moment they decided to enclose the back porch and add the brick-covered patio were poorly planned when it comes to water management and durability. The "original" (or at least oldest parts of the) frame of the porch included large 5"x6" posts in the exterior corners (Raw look to mill cuts and unpainted but aged wood make me think these have been there the longest, together with the size being non-standard for modern lumber and matching some of the interior support beams in the basement.) My guess is that these posts are 50+ years old. Likely next, chronologically, would be 4x4 posts added at the center of the porch, and on the exterior and interior sides of the internal stairway coming from the 1st floor to the side door; these posts are painted a grey-green color. In a matching paint color is a square frame that looks like it would have been for an exterior staircase on the NE corner. Following that are 2x4 pine boards that made up the base and vertical studs for the walls when the porch was enclosed. My guess is that the corner posts and painted posts were present before the porch was enclosed. Horizontal surfaces like steps and floorboards would have been more susceptible to weather and replaced when the porch was enclosed. Not sure if enclosure was pre-Carl, but my guess is that he enclosed somewhere between 20-30 years ago. This checks out with the hardboard siding which stopped being made by the late 80's.
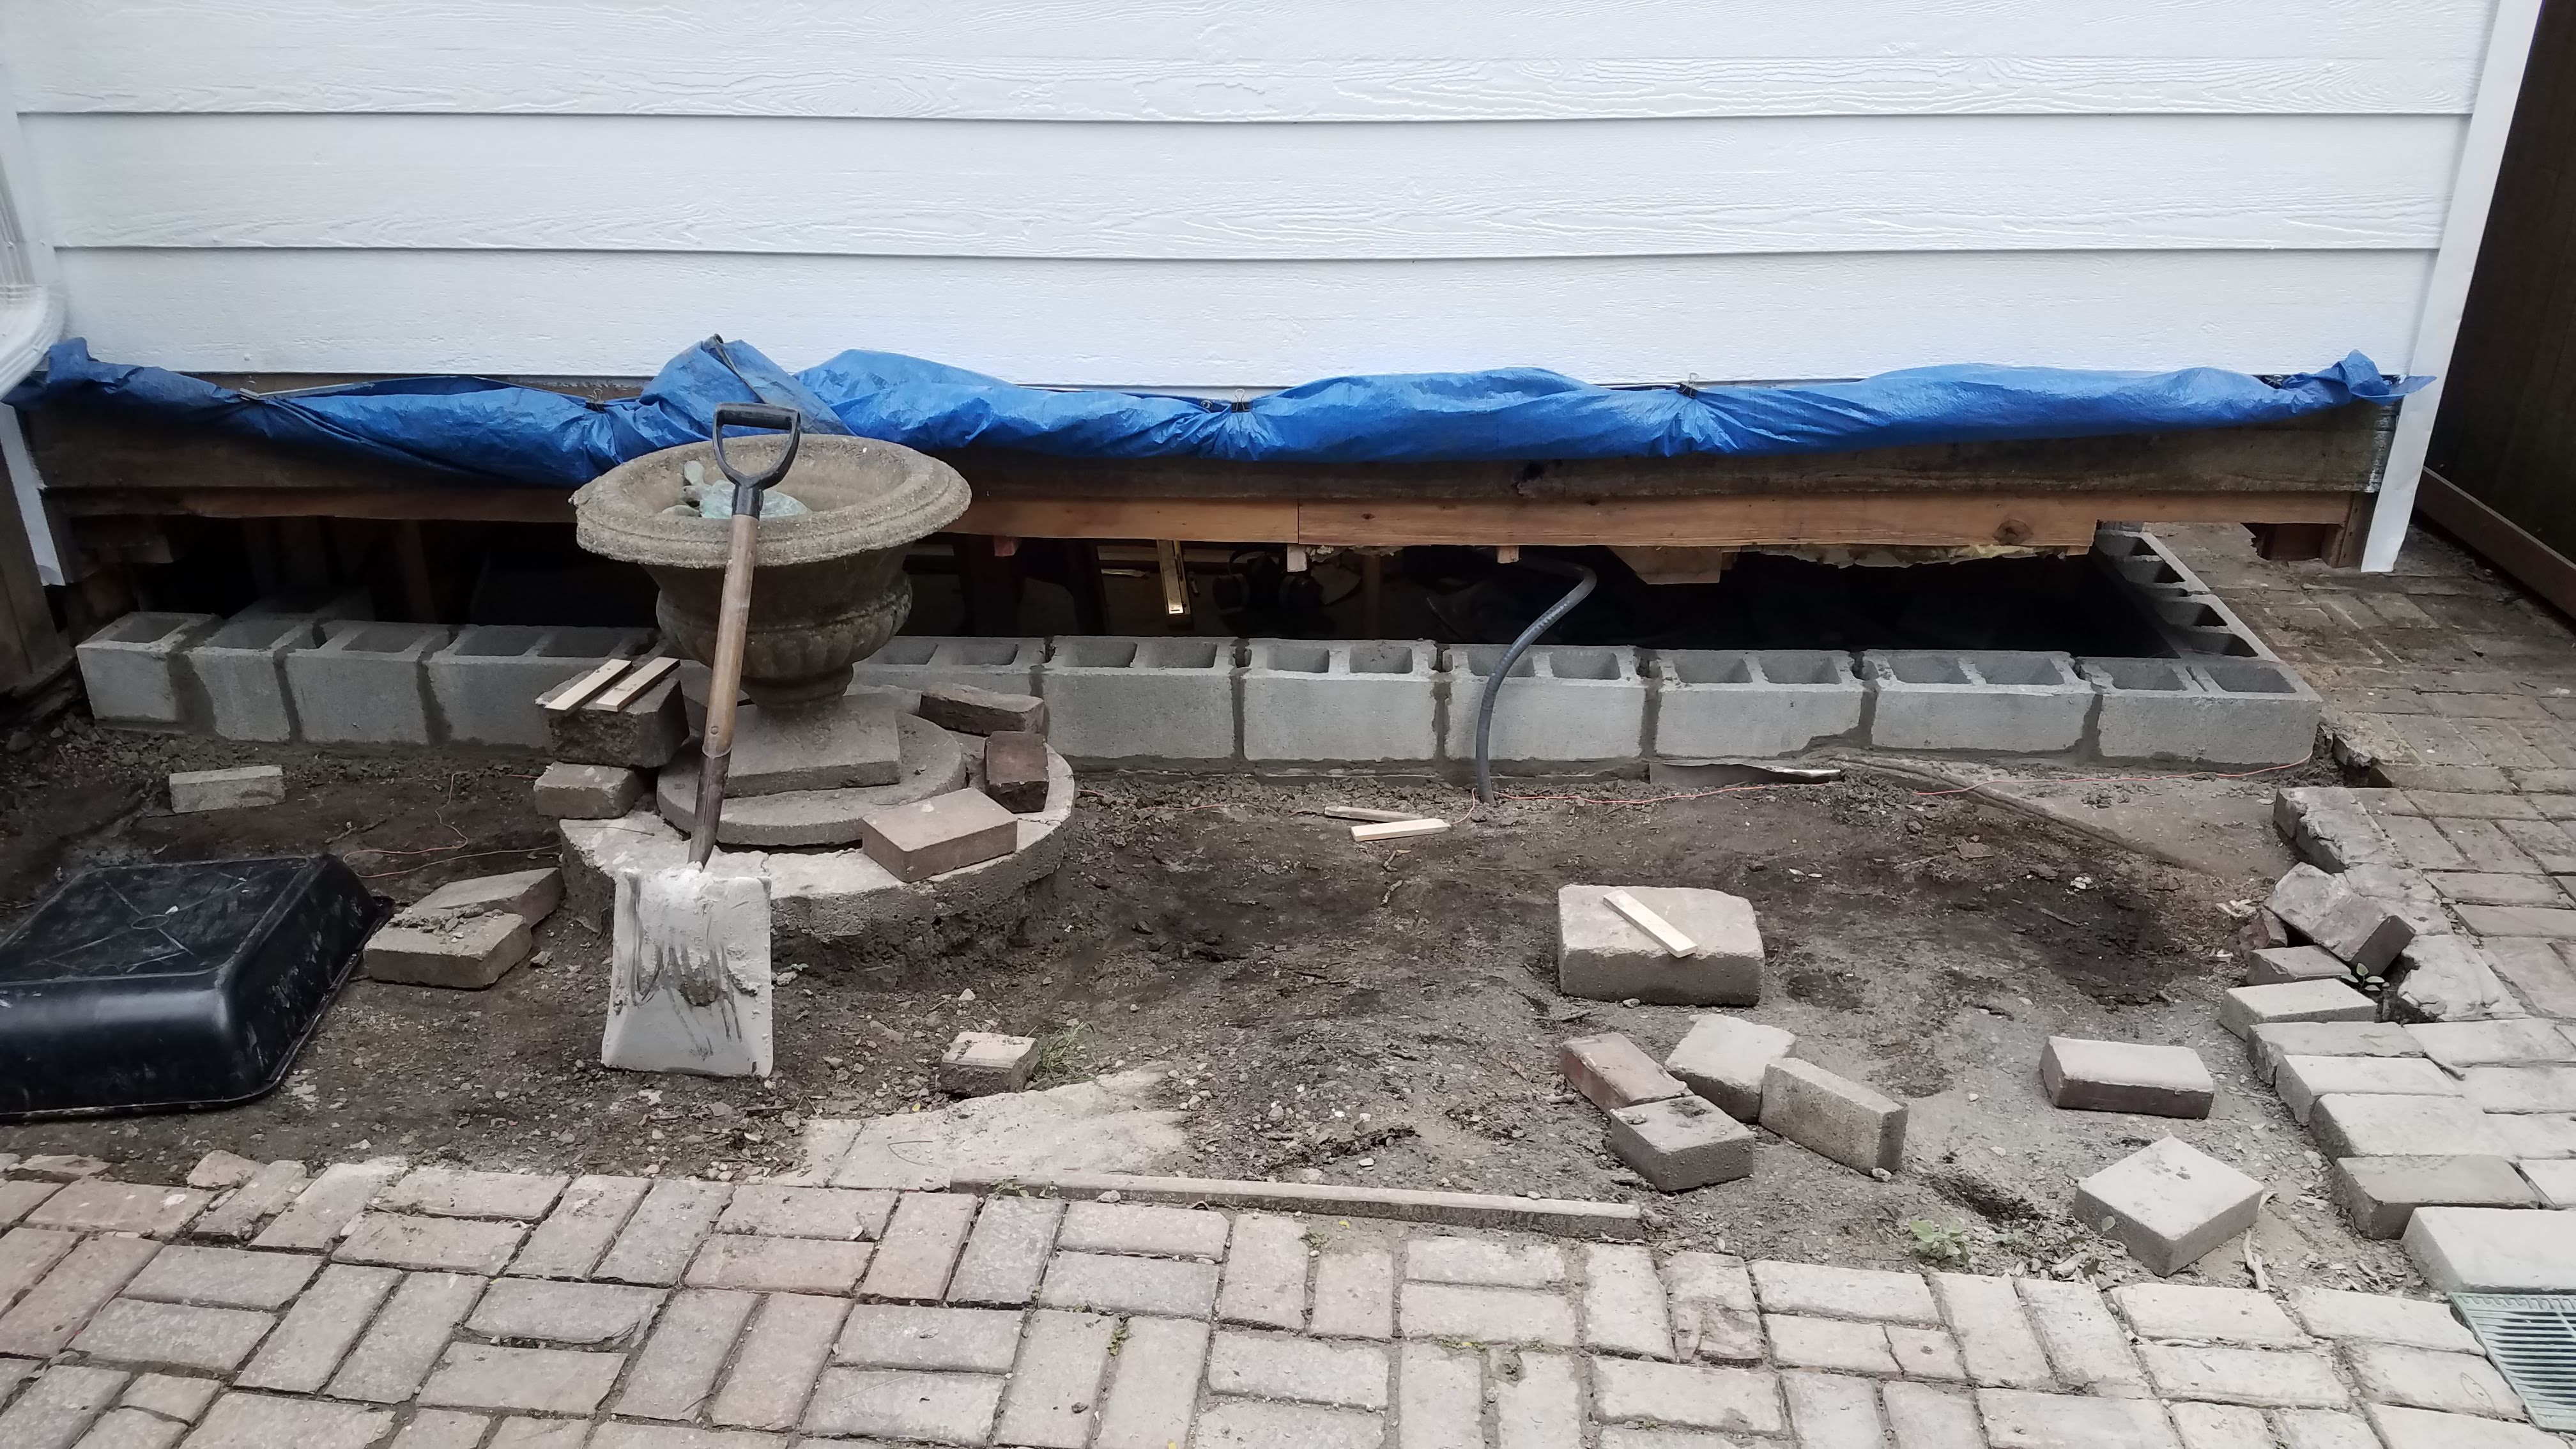
ROT! Along the long garden side wall the sill plate was completely rotted out with only small dark chunks and a few nails and bolts to be seen. The studs were rotted with a couple of inches at the bottom of each missing and rot extending on an angle up 10-12." The exterior corner by the stairs was made of a series of 3 2x4s in a confusing Z shape (One running with the 4" side flat to interior drywall does not seem to serve any structural purpose except perhaps providing a nailing surface for the drywall and last stair step. The sill plate wood along the short west facing wall containing the door was completely rotted out and mostly washed away by water from the higher level pavers along this wall (one of the few areas with mortared pavers.) Studs along this wall (which didn't have dirt piled along it, but had plenty of water intrusion) only had rot for the lowest inch or two. Not being enclosed under the stairs seems to allowed the area to wash away rot as well as air out between rainstorms.
Along the entire exterior of the porch 1/2 plywood was attached to the stud without any sort of vapor barrier and hardboard nailed in front of that was placed in horizontal panels going all the way down to the level of the foundation. When the garden bed was added, Some metal flashing was shoved in front of the hardboard as well as some plastic, pebbles, and concrete pavers, but no real "escape route" was created for water and by the time we uncovered it the bottom-most piece of hardboard was a barely a sliver of it's original 10ish inches. It only persisted where it was tucked under the higher board. Rot and water damage extended up to the 3rd side board. The plywood below/behind that had rot that extended between 12 & 20" up the wall. On the interior underside of the porch a mix of of concrete board and drywall were used to cover the studs. Removing these showed moisture and mold on the east and west (short) walls and actual dirt penetrating into the bottom portion wall on the entire northern wall. (The short west wall by the door looked like it had a small amount of dirt as well, but most of this was likely just the remains of the rotted sill plate)


Once cleared away of rot the porch was basically "hanging" with no actual supports along any of the stud walls on the North or West Sides. The eastern wall appears mostly intact despite the fact that the wall is actually sitting off the edge of the foundation directly on the dirt. (It looks like a piece of treated lumber may be below the current stud plate but we decided not to cut back any more than we needed to. We cut and made some half-lap supports to hammer under the major corner and stair supports, threw in a temporary sill plate and screwed 2x4 pieces along each of the studs to create a temporary support for the porch and reduce any "sagging" or "settling" until a more permanent solution could be installed. This wall should get very little water due to the small opening between our porch and our neighbor's along this eastern side.


Everyday of the summer, each time we walked out the basement door we'd see a new view.
At this point I told Jon that we had a few options.
Option #1 Would be to hire someone to do the planning and execution of the work. I was cautious/hesitant about this for a couple of reasons. The first being cost, the second being that in order to really "do it right" a contractor would likely want to remove or re-do even more of the porch that isn't strictly up to code (as I know that much of this porch was build on top of what was supposed to be an exposed exterior porch and that the guidelines for an interior structure are far higher and could include tearing out and pouring new portions of the foundation. I wasn't eager to spend a ton of money on a porch we rarely use and that we had already dumped a bunch of money into (see roof repair/replace, AC install.) And if they weren't a stickler for code I had to ask "would I even want to pay the type of contractor who would do the work that wasn't up to code?" If doing it the way I preferred, I felt like the work would be labor intensive but not necessarily skills intensive, but still very much structurally solid. So if we hired for this plan we would primarily be paying for the hard work vs. the knowledge and skills of others. I am willing to pay to have most things done well and done right when the skills exceed my own and the outcome is important to me, but if we weren't tearing down and building from scratch this project was likely not going to be up to code or any where near perfect, and none of it it actually gets us closer to my long term thoughts/ plans of having an upper roof or room extension on the 2nd floor. If anyone was going to do sub-code but structurally-solid grunt work I felt it should be us.
Option#2 Build a wood frame structure and replace hardboard with concrete board. Although at this point we had dug down to the foundation level in the dirt along the long exterior wall, this option had issues as the brick patio had raised the ground level from about 2"above the concrete on the West side to a high point 7" above on the side where the long North facing wall was. This was my husband's preference as it was a task he thought he could take on skills-wise. I said it was never advisable to have wood below the high point and that the only way I would agree to do this over option #3 was if we installed a french drain between the patio and the foundation/porch. Even with this completed, I estimated not more than 15-20 years before rot would again be a structural problem and I assumed we would always have some water intrusion and insulation issues.
Option#3 Cut out the studs a little higher than the rot to build a short masonry wall foundation on top of the poured slab that the wood frame would sit on. This was, in my mind, the most structurally sound option, but also the trickiest and relying on skills and time and tools we didn't have. We watched videos on building CMU (Cinder block) walls and using mortar, levels, and line levels and while they built up my confidence they made Jon even more intimidated.
Covid National Quarantine = TIME
Jon, a flight dispatcher, was not working at all at this point but still getting paid at this time and so he held firm to the time consuming option # 2 and just kept digging, installing a large french drain that would also accommodate new downspouts and a tile/floor drain in the patio. While he was at it he installed a new underground electrical line running to the pergola and updated our outlets and lighting on the pergola. We were finally at the point where a decision about the porch had to be made. We had almost run out of procrastination projects. Almost.


I had begun painting the interior rooms of the house and when I brought up caulking the nailheads and painting the hardboard siding as an eventual project for which a 5 gallon primer purchase was warranted, Jon took advantage of the nice weather and not only caulked and primed and painted the whole exterior of the porch, he did the aluminum coating on the pergola roof and I used a new router to repair/replace pieces of the exterior molding of an octagonal window that had rotted out in the western wall of the porch. I got swept up in the beauty of painting and we added green trim paint and updated the hardware and screens on the windows


Our porch now looked really pretty on the outside unless you were to look at the bottom 2 1/2 feet that were loosely covered in blue tarps with gaping holes underneath.
Some of you are shaking your heads at our procrastination projects and thinking that we should have waited for all the construction to be done before we did aesthetic activities. But here's my advice:
Never let anyone tell you that you should wait to make things look pretty. While it may make more sense to wait and you may end up repeating some of your work, paint is relatively cheap and excitement and motivation are not. If making something look good, even on a temporary basis is going to give you the motivation and energy needed to do the work yourself and feel invested in a project it is probably saving you money in the long run.
Gradually over this time I convinced Jon that a CMU wall was something we could handle if we just took our time and did it step by step. I did let him know that a lot of the work would be on him as not only was I going to be working soon, but I was not able to lift the heavy blocks (my knees were really bothering me over the summer and arthritis has me limiting usage of tools that vibrate heavily) I did offer multiple times to just pay someone to do this step, but at a cost of less than $2 per block, and nothing but free time, paying someone else was starting to seem ridiculous. We shopped about and continued research and by the time we got started it was August, summer PD for school was starting and I was heading back to work. This meant that I had to let go of a lot of my perfectionist micro-managing and just let Jon build the wall.
Problems build upon problems and building from scratch is almost always easier.
So you may realize that we started all of this with putting the A/C on top of the roof, then repairing the roof under the A/C, then we painted the walls, then worked our way down to building a foundation wall. Completely the opposite direction of work from what you should do when building something. Normally you would start with creating a foundation, then build on the foundation, then up and up, and out and in. So of course we knew there would be issues. From the beginning of planning I was really uncertain how we were to build the concrete blocks RIGHT UP to the bottom of the studs, leaving just enough room for a sill plate. We also debated various method for ensuring appropriate supports during the time without any along the outer edge where we were building the wall. For support we decided on a half wall a foot and a half in from the outer wall to support floor joists (which were, by way of studs and siding part of the overall structural support.) We used a line level to determine cutting heights for studs, which Jon then cut with the Oscillating tool. Turns out my bigger concern should have been the difficulty of keeping things square and cutting things level with nothing physical for reference (and poor communication between us about our visions/plans as I had imagined using blocks and a jig for the circular saw to cut these square and perpendicular to plumb)
Earlier I mentioned that the foundation was kind of in two pieces (the main slab, plus a slab on the west side corner) plus slightly raised "platforms" for each of the corner posts.
 Gap + difference in height where slabs met.
We knew that when laying our CMUs we would need to cut them to create a flat and level first course and then should have a much easier time with the second course of bricks. Now I love many things about Jon and believe he is smart and hardworking and considerate and a suitcase, boatload, or house or two of other lovely adjectives, but along with being colorblind, he has really awful spacial skills and is visually not a details person. Somehow he can attend to a million details of weight and air pressure and lift for determining fuel and abilities of aircraft but he can't tell if a picture is straight or notice if lines are parallel or make two things match in size by sight at all. He also is brand new most home improvement DIY; He's new to powertools, measuring tools like squares and levels, and doesn't have practice in doing much work with his hands. He didn't have a father and grandfather who were contractors and didn't go to art school starting at 8 years old and ending with a Bachelor's degree so I really can't expect him to have all the skills I have both knowingly and unknowingly developed over the years.
I taught Jon to use the angle grinder and circular saw with masonry blades to cut the CMUs. I did a few with him but my arthritis was bothering me with using vibrating tools so I tried to keep it to a minimum. Jon chopped up half the blocks, laid them out, bought more and kept cutting. Eventually we had the 1st course laid out (we even made and used 3/8"spacers to account for the mortar between blocks!) It was looking good with the line level and the straight edge bubble level. I was slightly concerned about some of the irregularities in the foundation (tilting of the block forward or back or up on just one corner) but none of these irregularities were extreme and I was certain this could be managed within the "tapping" of the blocks once the mortar was in place and given a 3/8" mortar variance between/around each block.


In trying not to sound like I'm criticizing my beloved, hardworking spouse, let me give advice to others instead:
Taking your time and going slow is always good advice, and you should plan carefully for what this will look like and what you are willing to compromise/ lose/ waste in order to do so. Don't be stingy with time or materials at this point!When doing DIY projects keep in mind that you are saving money by not hiring anyone else and also that means that if you do something wrong you can't be afraid of the cost of inexpensive materials when you need to rip it out and do it again or when you have to throw away materials. (I always want to use every last bit of plaster or joint compound but have had to teach myself that there will always be waste and that is okay, joint compound is ridiculously cheap, it is just labor and time intensive to mix in small batches, and those are things I have plenty of.) If you are planning to use something expensive do a test run with something cheap. Make templates out of cardboard or plywood, practice cutting with your new tool on concrete rather than marble. Wasted materials are not wasted if you learned valuable lessons.
So please, if you are doing your first mortaring project and don't have another person on hand, please don't mix ALL of your mortar at once and don't feel you have to "just keep going" to finish the job even when things come up that may not be perfect. PLAN. Practice in advance if you want--mixing and mortaring blocks then tearing them apart. If you aren't going to practice first, carefully pick the spot you are going to start out on-- maybe it's the easiest area, or the area that is least likely to be noticed/seen if you do something wrong. Mix your mortar to three different thicknesses/amounts of water and a couple of different tools and practice your mortaring skills with each, determining which works best. If you have issues stop and watch some Youtube videos and read some articles and throw away that batch of mortar as a learning lesson. Go buy a better trowel or another tool if you need to.
Please don't let your wife come down for the 10 minutes she has in the middle of her day of nearly back-to-back meetings and see that the mortared wall is finished but not straight or square or plumb underneath where the sillplate will go. Please don't tell her "Yes, I noticed it wasn't square towards the end as well, but I had to finish before the mortar set." "Can't we just fix that with the ____(next course/ shims/ flashing/ other Carl-like-ideas)?"
Take your time, be okay with frustration and errors and waste if it means you can make a your wall straight and level and perfect, because you started out with an imperfect surface that Carl gave you and your job is to MAKE IT BETTER THAN YOU FOUND IT.If that means you lay just 5 blocks a day and it takes a week to finish, but you do it perfectly, it still may save you time in the long run because perfect means not having to adjust and problem solve all over again at the next step. And that means your level of perfectionism has to be better than Carl's. It has to correct some of his mistakes and then go further. Otherwise the second course of bricks and the sill plates are going to require more and more and more and more "little" adjustments and problem solving to make them work and by then it will be November and your spouse will be cold and frustrated, kneeling on the really cold ground or concrete and trying to make a sill plate slide under unevenly cut studs on an uneven wall surface by using a chisel and a router to "adjust" every other stud's resting place in the wall sill plate.
If one of you is the better (or pickier) problem solver or planner, make sure to pick their brain, ask questions, draw pictures or brainstorm with you until you have a clear plan for what you are doing and how you plan to solve issues. Increase your vocabulary knowledge and modeling/ drawing/ writing skills. Make a demo piece if you need to understand what someone else is saying or to ensure you are understood. While it's unfair to make one person solve all of the problems and handle all of the cognitive load (unless you hire a contractor), a clear plan helps everyone be happy with the end results. We'd all rather be working than planning, but we'd also rather be planning longer than having to either re-start our work or problem solve a whole lot of new problems that came up due to miscommunication, poor planning, or poor execution of plans. If you're not good with words: use pictures. If you are good with words write it all out and make sure you explain any confusing or ambiguous vocabulary to any less wordy compatriots in your mission.

This is me cutting the plywood siding off at the "final" height along a chalk line. Something that, if done earlier would have made setting the second course of blocks WAY easier. I had mentioned to Jon at some point weeks, possibly a month or more earlier that I didn't want to have to attach just a narrow strip of plywood and wanted the plywood cut at a higher level (allowing the section we need to add on more nailing locations along studs than if we just added a small strip along the bottom). But since this task hadn't impacted any of the work I had done I didn't think to tell him to do it prior to him starting the concrete block work. This is one of the many times I shook my head and said "but why didn't you ask for help? I could have made this so much easier for you!"
If all of this sounds really ominous and irritated I apologize. Trying to get those sill plates, and a couple of new structural supports in place in took a lot of patience, and exposure to the cold. And I hate the cold.
Here's the good news that I told Jon from the beginning to help get him on board for using concrete blocks: There are whole houses sitting upon nothing but a few concrete blocks just stacked (un-mortared) at the corners. Even if our porch wall has crappy mortar and isn't level or plumb or square it will still successfully hold up our porch (and expensive A/C condenser). Structurally we will be fine. Whether we will succeed in keeping moisture out, eliminating rot, and potentially increasing our annual usable time on our porch through better insulation properties has yet to be determined, but we've got a much better shot at all of it with the concrete block foundation that is now built.
So. It's December January and that's pretty much where we're at. We added termite flashing, closed cell foam, the sill plate boards in treated lumber, and a few structural supports in the corners and a few cripple studs along the lower wall. We left up our tarp and have adjourned for the winter.

In the spring our plan is to complete/ add the following:
Plywood siding attached to studs and sill plate and topped with a Tyvek-like house wrap/ vapor barrier. We will use Hardie Plank wood grain siding in as close to the original Hardboard dimensions as possible to finish the exterior and will install an exterior/water tight electrical outlet on the siding as well. Flashing tape will be used to help seal around joints and seams (such as the old to new plywood) and expanding foam will help seal up any air gaps (such as along the sillplate to the plywood wall. We will continue to evaluate the CMU wall to see if it needs futher sealant on exterior to reduce water penetration. We may add rigid foam insulation along the interior or exterior of the bottom wall to reduce outside cold penetration.
Down the road I have plans to cover the dirt just outside the long Northern wall with pebbles for drainage to the french drain and build a low deck over that with built in seating coming up to the top of/hiding the cement block. I might eventually also like to move the location of the exterior door as the current location will always have issues with water intrusion (The pavers were built up in front of the door so the base of the door is lower than the surface of the patio.) But these improvements are likely years away and presently I am just looking forward to the day where there are no open gaps or blue tarps and we can begin entertaining outside again without walking through a construction zone.

Comments
Post a Comment